 Storage Shippers
| Document Version | v.1 |
|---|---|
| Document Last Updated | 8/29/2022 |
| Software Version Documented | v.9.8.29 |
Overview
This process document will go into detail about Store Order aka. Storage Shippers and how to utilize them within Savance Enterprise. Store Orders will allow you to convert an order as normal, allocating stock and invoicing as if the material was physically shipped from your warehouse, but instead, it is stored elsewhere in your warehouse until the customer is ready for the shipment.
Store Order
Store Entire Order
Within a quote you will now have the option to Store Order. This can be done on the whole order level, or you can select specific items within the order to store for your customer.
-
To view where to select Store Order go to New > Quote/Order to open a new quote.

-
In the order header, you will see the check box ‘ST’ for Store Order.

-
When selected at the time of the order, this functionality will store all line items on the order.
-
Continue to place an order as normal, by entering the customer’s account and line items.

-
When the order is completed select ‘Convert’

-
Upon converting a shipper will get created and the normal warehouse process will begin.

Store Selected Items on Order
There are two ways to store individual items on order. 1) At the quote/order level, and 2) within a shipper. This next section will show both ways.
Order Level
-
To view where to select Store Order go to New > Quote/Order to open a new quote.
-
Enter the customer's information and line items as normal.

-
Next, find the item(s) in which the customer would like you to store.
-
Using the line item grid, scroll over to locate the ‘Store’ column.

-
From that column, select the items the customer wants you to store.
-
When the order is completed select ‘Convert’
-
Upon converting a shipper will get created and the normal warehouse process will begin.

Shipper Level
Regardless if you selected the whole order to store or individual items you can also adjust those options within the shipper.
-
Once an order has been converted select the ‘Status’ tab to view the shipper.

-
Select the Shipper to open and view.

-
While viewing the shipper locate the ‘Store’ column, and from there uncheck or select the items the customer wants to store.

Storage Bins
Once an order has been converted the warehouse process will begin. The goal of using storage shippers again allows you to convert an order, take payment/invoice, and allocate stock as normal. The only difference is you are storing the orders elsewhere (Storage Bin) in your warehouse until the customer is ready to receive them.
-
Once a shipper has been created the warehouse process will begin. A Pick Ticket will be printed for the warehouse to pick and “ship” all the items.

-
Once the shipper has been filled. The Shipping tab below will appear. To store the order under the Storage Location drop-down select ‘ Storage Bin’


-
NOTE: If you do not select a Storage Location when you try to post the order to ‘Stored’ you will receive the following error message:

-
-
Then post the shipper to ‘Stored’

-
Finally, the normal accounting process will take over to Invoice the customer.
Viewing Warehouse Inventory Log
-
While in a Shipper you can view the warehouse log for a particular item by right-clicking on the item and selecting ‘View Warehouse Log’

-
The inventory now shows that it has been “shipped” / removed from the warehouse inventory and moved to the storage bin.


-
While in the Warehouse Inventory Log, you can select the Filters icon to open additional filters.

-
By adding the filters you will now be able to toggle between the ‘Normal’ and ‘Storage’ warehouse inventory log view.

-
Select ‘Storage’ and hit the ‘refresh button.

-
From here you can get a condensed version of all Inventory values for that particular item that is currently in the storage bin (marked as ST from an order)

Storage Shippers
Once the customer is ready to have their order or items shipped to them you will now create a Storage Shipper.
Create a Storage Shipper for the Entire Order
-
Search and open the customer’s order by selecting ‘Open’ and the Object Browser to search for the order and once found open it.


-
Next, select the ‘Status’ tab to view the shipper.

-
You will notice that you can toggle between the two tabs that show ‘Normal’ and ‘Storage’ Shippers.
-
To create a Storage Shipper select ‘Release Management’

-
The Release Management screen will open in ‘normal’ mode. Select ‘storage’ mode.

-
On the Release Management screen you can see:
-
The line # they appear in the original order.
-
MFG
-
Part Number
-
Stored Shipper #
-
Description
-
Quantity
-
Quantity to Release
-
Remaining/Original Remaining quantity
-
Action
- Release All Stored or Revert
-
-
In our example below we are going to release all stored material because the customer is ready for their entire order. To create the Storage Shipper I am going to select ‘Release All Stored’

-
While I select ‘Release All Stored’ the Qty, Quantity to Release, and Remaining columns will adjust accordingly to the amount originally ordered.

-
Also while selected the items will show under the ‘Shipper to Allocate Details’ on the bottom half of the Release Management screen.

-
If for any reason you want to revert your selections you can select the ‘Rollback All’ button, which will undo all selected to be released or the back arrow and a specific item to remove the released item.
 or
or 
-
Next, when you have selected what items you want to release and create a Storage Shipper select ‘ Allocate Shipper.


-
Once the storage shipper is generated you will be placed back in the order on the ‘Status’ Tab. From here select the ‘Storage Shippers’ tab.

-
A storage shipper has now been created. To select on the shipper to open.

-
You can see at the top of the shipper it is marked ‘STORAGE SHIPPER’
-
The warehouse process will take over to pick and pack from the storage bin location where these items were already allocated to.

-
Finally, once the material is shipped/picked up the warehouse will post the order to ‘Delivered’.

Note for Receiving Items for Storage Orders
-
If a linked PO is created from the Storage Order and the entire qty of the receiver will be applied to that order, you now only receive directly to “Store” without having to receive and then put away.
-
When ready to receive, pull up the linked PO and open the receiver in the Status tab.
-
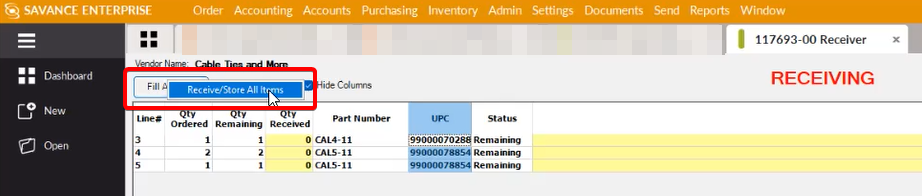
In the Receiver, click Fill All Items to quickly enter the entire receiving qty for all lines.
-
Then upon clicking Post , the only option is to click Received/Stored.

-
Since the original order is the backorder, the Hold For Backorders screen also shows what lines are for storage orders. This example shows the entire receiver is for a storage order.
-
Also, if the entire storage order has been received in a linked PO, the shipper for the order will automatically be created and delivered.
Create a Storage Shipper for a Partial Order
In the scenario the customer would like some of their order, not the whole order you can create multiple storage shippers and partially ship the order.
-
Search and open the customer’s order by selecting ‘Open’ and the Object Browser to search for the order and once found open it.

-
Next, select the ‘Status’ tab to view the shipper.
-
You will notice that you can toggle between the two tabs that show ‘Normal’ and ‘Storage’ Shippers.
-
To create a Storage Shipper select ‘Release Management’
-
The Release Management screen will open in ‘normal’ mode. Select ‘storage’ mode.
-
On the Release Management screen you can see:
-
The line # as they appear on the original order.
-
MFG
-
Part Number
-
Stored Shipper #
-
Description
-
Quantity
-
Quantity to Release
-
Remaining/Original Remaining quantity
-
Action
- Release All Stored or Revert
-
-
In the example below we are going to release some of the stored material because the customer is ready for some but not all of their order. To create the Storage Shipper I am going to enter the amount the customer wants in the ‘Quantity to Release’ column

-
While I enter the ‘Quantity to Release’ (qty25) you will see the Remaining/Orig. Remaining reflects that I want to take just 25 and there will be 25 left.

-
Also while selected the items will show under the ‘Shipper to Allocate Details’ on the bottom half of the Release Management screen.

-
If for any reason you want to revert your selections you can select the ‘Rollback All’ button, which will undo all selected to be released or the back arrow and a specific item to remove the released item.
- or
-
Next, when you have selected what items you want to release and create a Storage Shipper select Allocate Shipper.
-
Once the storage shipper is generated you will be placed back in the order on the ‘Status’ Tab. From here select the ‘Storage Shippers’ tab.

-
A storage shipper has now been created. To select on the shipper to open.

-
You can see at the top of the shipper it is marked ‘STORAGE SHIPPER’
-
The warehouse process will take over to pick and pack from the storage bin location where these items were already allocated to.
-
Finally once the material is shipped/picked up the warehouse will post the order to ‘Delivered’.
-
When the customer wants more of their order, just repeat the same process above. As each new Storage Shipper is created it will be listed under the ‘Status’ > ‘Storage Shippers’ tabs on the original order.

Create a Storage Shipper from a Direct Order
In the scenario that you are placing a Direct Order for a customer and the vendor can not ship directly to the customer you can also create a storage shipper. By creating a storage shipper you are bypassing moving the material in and out of your system’s inventory.
-
To create a direct order select New > Quote/ Order
-
Enter the customer’s name and information in the header.
-
Next, while in the header select ‘Direct’

-
Then enter the item(s) that you are going to order directly from the vendor.
-
Once the order is completed, select ‘Convert’. Once the order has been converted the RFQ (Request for Quote) for the direct items will appear.


-
Following your company’s Purchasing process an RFQ will be created and then converted into a PO by Purchasing.

The normal process after a Direct PO is converted is that the Vendor will ship the order directly to the customer. However, in the event that the Vendor can not ship directly to the customer, but is shipping to your location instead you can create a Storage Shipper at the time of receiving.
-
When the Direct PO is received the warehouse will mark the receiver as ‘delivered’


-
Finally you will Post the received to ‘Delivered’

-
Once that is completed at the warehouse level, it will create a normal shipper within the original order.

-
From here you will open the normal shipper and select the ‘Store’ column.

-
Since it was a direct order there is nothing else to do on the shipper but to ‘Save and Close’

-
Back in the original order on the ‘Status’ tab select ‘Release Management’ to create a Storage Shipper.

-
Select ‘Released All Stored’

-
Then finally select ‘Allocate Shipper’ and your Storage Shipper will be created.


-
When the customer is ready for the shipment, follow the shipping steps mentioned in the above sections.